How can I set up a NodePort service to make my application accessible?
In this scenario, you have been assigned the role of a DevOps engineer at Sample Startup Corp. The company is exploring the use of Kubernetes for their workloads and is currently focused on deploying Pods as their primary resource. However, a major challenge they face is dealing with multiple instances of Pods running in the cluster for high availability. Each Pod has a unique set of IP addresses associated with it, which constantly change as Pods are created or terminated. Additionally, there is a requirement to expose the application on the internet.
To address these challenges, a consultant has suggested using a NodePort service. Your boss has asked you to develop a proof-of-concept to demonstrate its effectiveness.
Objectives
Create NodePort Service To Distribute External Traffic Across Pods
Using Selectors to Distribute Traffic
Create Custom Namespaces to Organize Application
Requirement
Basic Understanding of Pods
Understanding of Kubernetes Services
Basic Understanding of Kubernetes Namespaces
What you'll learn
NodePort Service
Creating Pods through Manifest files
Namespaces
Establishing Service to Pod Connectivity
Your project assignment
You have been assigned to create a proof-of-concept for the development team. The team has raised an issue regarding the application's multiple instances running in Pods across Kubernetes nodes for high availability. Each Pod has a unique and constantly changing set of IP addresses. The team requires a single IP address that can handle traffic distribution to all the Pods hosting the application. Additionally, there may be a future need to expose the application on the internet. To address this, a consultant has suggested using a NodePort service as a means of initially distributing traffic among the Pods.
Here are the specific requirements for the proof-of-concept:
All resources must be created within a custom namespace named "payments-app."
To simulate the application, you should launch a total of two Pods based on Nginx and Apache images.
All resources must be created using manifest files (YAML) to align with the team's version control practices using Git.
During the testing phase, it is essential to verify that any requests sent to the service are appropriately distributed among both Pods.
Task 1: Creating Namespace for Isolating Resources
Create a new namespace that will be hosting production Pods. The name of the namespace should be payments-app
Task 2: Creating Pods in Custom Namespace
Create a total of 2 Pods, based on Apache and Nginx images in the Custom Namespace, named payments-app. Ensure that the Pods are created using the Pod Manifest file (YAML file). Ensure both the Pods have the same set of Labels.
Task 3: Test Pod Connectivity
Verify and test if the default webpage is returned when you send a GET request to both the Apache and Nginx Pod IPs.
Task 4: Creating NodePort Service in Custom Namespace
Create a NodePort service in the payments-app Namespace. Associate both the Nginx and Apache Pods with this Service.
Task 5: Test the End to End Connectivity
Test the End to End Connectivity by sending the GET request to the NodePort service and verify if you get a response from both the Nginx and Apache Pods.
Task 1: Creating Namespace for Isolating Resources
1. Create a new namespace named payments-app which will be hosting all the production related Pods.
kubectl create namespace payments-app

2. Verify if the namespace is created. Ensure you see payments-app in the list.
kubectl get namespace

Task 2: Creating Pods in Custom Namespace
- Create Pod manifest for Pod 1 based on the
nginximage and store it to a file namedpod-1.yaml.
kubectl run nginx-pod --image=nginx -n payments-app --labels="app=payments" --dry-run=client -o yaml > pod-1.yaml

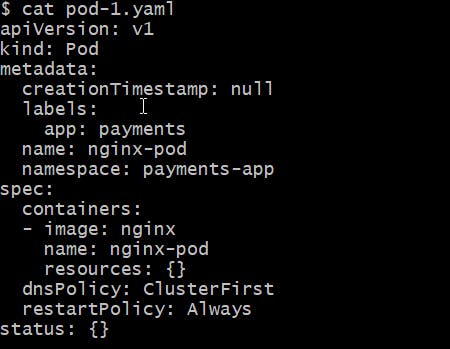
2. Check and verify the contents of the YAML file using the cat command.
cat pod-1.yaml

3. Create Pod manifest for Pod 2 based on the Apache image and store it to a file named pod-2.yaml.
kubectl run apache-pod --image=httpd -n payments-app --labels="app=payments" --dry-run=client -o yaml > pod-2.yaml

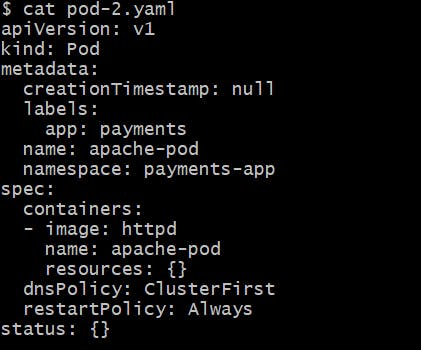
4. Verify the contents of the YAML file using the cat command.
cat pod-2.yaml

5. Create both the Pods from the manifests file.
kubectl apply -f pod-1.yaml
kubectl apply -f pod-2.yaml

6. Verify if both the nginx and apache pods are running successfully in the payments-app namespace.
kubectl get pods -n payments-app

Task 3: Test Pod Connectivity
1. Find the IP addresses of the Apache and Nginx Pods that are running in the payments-app namespace.
kubectl get pods -o wide -n payments-app

2. Send a GET request to the IP address of nginx-pod using curl command.
Format: curl <IP-OF-NGINX-POD>
Verify if you can see the "Welcome to nginx" output returned.

3. Send a GET request to the IP address of apache-pod using curl command.
Format: curl <IP-OF-APACHE -POD>
Verify if you can see the "It Works!" output returned.

Task 4: Creating NodePort Service in Custom Namespace
1. Create a manifest file for NodePort service using kubectl expose command.
Since both the nginx and apache Pods have same labels, you can use any one of the Pod names while generating the manifest file.
Store the manifest to file named node-port.yaml
kubectl expose pod nginx-pod -n payments-app --name nodeport-service --port=80 --target-port=80 --type=NodePort --dry-run=client -o yaml > node-port.yaml

2. Check and verify the service manifest stored in node-port.yaml file
cat node-port.yaml
Ensure that you have appropriate selector present in the manifest files.

3. Create a NodePort service by applying the manifest file.
kubectl apply -f node-port.yaml

4. Verify if NodePort service is created in payments-app namespace.
kubectl get service -n payments-app

5. Ensure that NodePort is associated with the total of two endpoints.
In the below screenshot, we can see two endpoints (IPs) registered, namely 10.1.4.23and 10.1.4.24
kubectl describe service nodeport-service -n payments-app

Task 5: Test the End to End Connectivity
1. Verify the NodePort number that is associated with the node-port service.
kubectl get service -n payments-app
In the following screenshot, we can see that NodePort is 31235

2. Find the Endpoints IP associated with Kubernetes
kubectl get endpoints

3. Send a GET request to the Endpoint IP followed by NodePort.
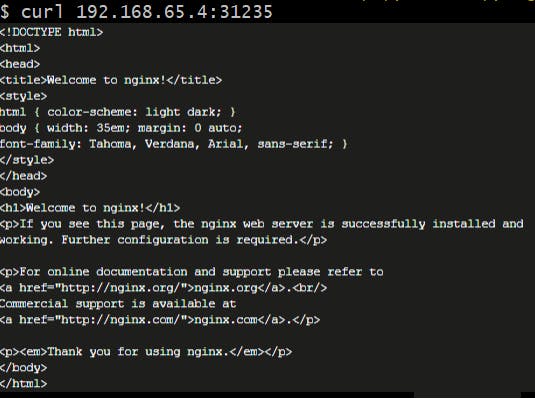
curl 192.168.65.4:31235
Ensure to replace the NodePort (31235) to the NodePort number in your workspace.
In the first response, we got output from the Nginx POD.

4. Send a GET request to the Endpoint IP followed by NodePort.
curl 192.168.65.4:31235
In the second response, we got output from the Apache POD.

There is a possibility that you may get consecutive responses from the same web server (either apache/Nginx). In such case, you can wait for 2-3 minutes and then try running the curl command multiple times to verify if you are getting responses from both of the PODS.
By using the above i setup a NodePort Service to access my application